Monday, June 16, 2014

CLAY BUNT CAKE CHARM

 
I think this is a very easy and cute charm that will only take about 15-20 minutes.
Please Comment
 
SUPPLIES
clay
chalk(brown, yellow, white, and maroon)
toothpick
mod podge or school glue
eye pin

1. Take some clay and roll it into a ball
2. Next gently push down on the top of the ball to make a different shape
3. Now take the top of your paint brush and push it down the middle of you clay to make the hole and put an eye pin in the top
TIP- If you want it to look more realistic make the hole start big and end small
4. Take your yellow ,maroon , and brown chalk and dust the whole this with chalk
5. Now it's time to use our toothpick make indentations down the sides ( use the picture to help you)
6. Now let it dry and after it's dry it is time for the fun part making the topping
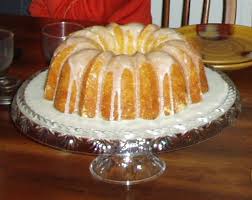

TOPPING
 
icing- Mix any color of chalk into some mod podge and mix it. Add more chalk to the mod podge to make it darker and more solid.
 
nuts- Make a thin sheet of clay and dust it with chalk to make it look baked. Let it dry and cut chunks off off it to make nuts to go on your bunt cake
 
TIP- Pour icing onto the bunt cake and right after place nuts onto the places with icing


COMING SOON-my clay charm collection
 

Sunday, June 15, 2014

CLAY PEAS IN A POD

.This is so cute and trendy. I got the idea for the YouTude channel SuperCreativeCrafts.I made mine a little different
Please Comment
 
SUPPLIES
clay
white craft paint
green craft paint
black Sharpy marker
eye pin
toothpick
mod podge


First shape your clay into a log shape and squeeze the ends to be the pod.Next roll out 3 balls to be   the peas. Take a toothpick and create a slot in the pod. Carefully arrange the 3 balls inside the slot.Now use your fingers to push the pod edge around the peas( constricted pod). Now push an eye pin inside the charm. Let it dry or bake. Now mix the white paint into the green paint to make a light shade of green.Paint the peas with the light green paint and let it dry. Now paint the pod with the regular green(this should be a grassy green) and let it dry.Finally draw small faces on the peas with your Sharpy marker and seal everything with mod podge. I hope you like this charm!


Sorry I had some really cute pictures of my charm but I can't seem to load them onto my blog.

CLAY SCHOOL CHARMS

 
Hi everybody! So the school year is almost out so I decide to make school related charms. I chose a pencil ,piece of paper, an eraser, and a mini chocolate chip cookie.
Please Comment
 
SUPPLIES
(for paper charm)
clay
red paint or pen
turquoise paint or pen
eye pin
 
Lets start by making a rectangular prism that looks like a  small piece of paper.
width-2 1/2 cm
height- 1 cm
length-3 cm
Now put a eye pin into the top of the piece of paper. Next let it dry or bake it.


SUPPLIES
(for pencil charm)
clay
eye pin
pencil
tin foil
eraser clay
marker
 
clay cute on YouTube made this video
and it will tell you how to make eraser clay! I made mine a little different instead of rubbing an eraser against paper I rubbed mine against a white  HI-POLYMER eraser.

Start,by rolling a piece of clay into a long skinny snake with a tip at the end. Now,attach a small piece of pink eraser clay on the other side of the pencil. Stick the eye pin into the top of the charm(eraser).Now let it dry(the eraser clay drys better when it's cold put it in the fridge for 24 hours). Next take it out of the fridge and take a marker and color the pencil any color of your choose.I chose blue. Now take a real pencil and color on the tip to be the led.Finally take a small strip of tin foil and rap it around the top to resemble the metal thing that hold the eraser on the pencil.( very fragile)
SUPPLIES
eraser clay
Sharpy
eye pin
First make some eraser clay.Next make a rectangular prism and use a blade to shape the eraser(Use the picture to help you make it). Now stick an eye pin into the top and let it dry or bake it (I don't know what will happen if you bake it so I suggest you let it dry)Now draw a cute face on it. You have now made an eraser charm!
 
Make a mini cookie using my Clay chocolate chip cookie post.


CLAY CHOCOLATE CHIP COOKIE

This is the easiest charm ever and you can play with it to make different cookies. I have  made about 35 of these.
Please Comment
 
SUPPLIES
clay
chalk pastel
 old toothbrush
brown sharpy or paint
eye pin
 
First roll out a ball of  translucent clay and pat down on it to make it a cookie shape.Stick an eye pin into the top to make it a charm. Texture it with a toothbrush and dust it with yellow ,maroon ,and brown chalk. Now let it dry.Finally paint or draw brown chocolate chips on it.
TIP- be creative

SOME OF MY FAVORITES

 
blogs-toniellison.blogspot.com    myfroggystuff.blogspot.com   sugarcharmshop.blogspot.com and OLIVIA'S CRAFT CORNER!!!!!

YouTube channels-toniellison ,the sorry girls ,my froggy stuff ,coolricebunnies, sugarcharmshop, and so many others

 food- no bake cookies,chicken noodle soup,nectarines,caramel brownies, my Mom's cinnamon bread

hobbies- crafting, playing with animals, and shopping

songs- Welcome to the Show ,Ready or Not ,gold ,and All This Time - Britt Nicole
Speak Life ,Me Without You, and Unstoppable-Toby Mac
Gods not Dead, Your Love Never Fails- Newsboys
Cup Song ,Overcomer ,You can Count on me- mixed

places-mall ,my church ,Grandma's house, and many other places

books/series- Katie Kazoo ,The Land of Stories , and One Hundred Dresses

movies- Gods not Dead ,Bedtime Stories ,The Muppets ,and Garfield the Tail of Two Kitties


Thursday, May 29, 2014

CLAY DUM DUM/ LOLLIPOP

I saw Toniellison's video on YouTube and I thought this was a really great charm. So of course I made it.Go to Toniellison's blog and check it out and make some of her clay charms.
Toniellison.blogspot.com


Watch her video! I made the bubble gum one
toniellison.blogspot.com

Sunday, May 4, 2014

MINECRAFT CLAY CREEPER

Minecraft is very popular so I thought I should make a clay creeper. This is a great homemade birthday gift if you have a friend or a sibling who likes minecraft.
 
 
SUPPLIES
clay
2 different shades of green craft paint
paintbrush
toothpick
black craft paint
craft foam
white craft paint


MAKING THE BODY
First make a cube with your clay to be the head of the creeper. Spend time on this to make it you very best.Next make a rectangular prism for the body. Make a second rectangular prism But this time it should be skinny. Take the skinny rectangular prism and cut 4 pieces off of it all of them should be about 1-2 centimeters tall(these are the legs).now connect the head and the body together and then put the legs on. Now make the indrntion of a creepers face on the head. Then bake or air dry.
 
 
COLORING THE BODY
OK lets start on the colors.As you can see creepers
don't just have one solid color. They have many shades of
colors like green.Now we are going to paint the creeper one solid color to be the base color. Mix the green paint with the black or
face of a creeper reference tool
white paint to make a different shade of green. There are many
possible combinations that you could use so you should have more than
3 colors. Next you want to cut a small strip of foam, make sure that the end is a square.
Now dip the end of your foam into one of the colors and stamp it onto the creeper.
Keep doing this until most of the creeper has squares on it.
Finally paint  the face and the feet with black paint.
THEN YOU'VE  MADE A CLAY CREEPER!!!!!
 

Thursday, May 1, 2014

CLAY GUMDROP CHARM

This charm is so easy !!!!!!!!!!!!!

SUPPLIES
clay
paint
salt
eye pin
rock or something hard and roundish  

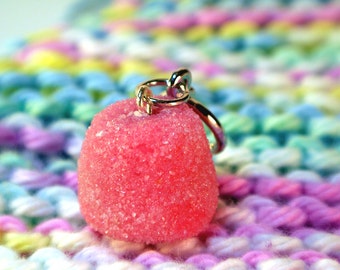
this is not my gumdrop I just did not have enough
time to take photos of it . It looks like this except
mine is green.
I Lets start by taking our salt and our rock and smash the rock into the pieces of salt to make them as small as you can make them. Next take your clay and roll it into a ball shape. Than make a base(make it into the shape of a gumdrop).Now take some of the salt that we crushed and sprinkle it on and press it in the clay gently. Before baking add an eye pin to the gumdrop. Bake your clay or let it air dry.once it is done paint it and glue extra salt to it to make it more realistic.


EXTRA CUTENESS: make little circles and a small smile and place it onto your gumdrop to make it kawaii


Sunday, March 2, 2014

DUCT TAPE BAG for beginners

 
My first duct tape bag was with this method. That's why I put "for beginners''in the title(thank you captain obvious), but I personally think everybody can do this. Especially if you running out of duct tape.
Please Comment


SUPPLIES
clear scotch tape
duct tape
Ziploc bag
ribbon
scissors
 
 
Begin by taking your plastic bag and duct tape and start wrapping your duct tape around the bag. (TIP-make sure you start wrapping it around at the top were you open it)wrap it continually around until you get to the bottom of you bag. Then cut it and tuck the extra around the side of the bag. To keep it from waring out wrap it in clear scotch tape or duct tape. Lastly take so ribbon and tape it inside your bag for a strap. I personally think that it looks cuter as a long shoulder strap.


CUTE DECORATIONS
 
  • make a bow out of extra ribbon and tie it onto the shoulder strap cute!!!!!
  • braid three pieces of ribbon together and tape inside you bag to be an even better look
 
 
Remember this can also be a last minute gift for a friend. Just stuff with goodies and your done.


CRAYON MELTING QUOTE

 
I love this project because it is just so so cute and inspirational and it is a great idea for presents for
grandparents . You can create cute and personal quotes or inside jokes on this and that's why it is great for your best friends!
(I got this idea from BeautyPolice101 YouTube channel)


SUPPLIES

box of crayons

strong glue

big piece of card stock paper

black marker or pen

hair dryer

pencil


1-take your card stock and draw a big heart so the bottom left corner is the tip on the heart
2-write a quote or a saying inside the heart and trace over the heart and quote in some sort of pen
3- take the crayons and pick out the colors you want and glue them to the perimeter of the heart
4-let the glue dry and the take it outside
5-blow dry the crayons and let the melted crayon drip down
6- set to dry for about 10 minutes
7- put it into a picture frame and enjoy

Saturday, February 15, 2014

MAKING A CLAY DOG CHARM


This is my own idea. When I was trying to make a different charm it turned out to look like a dog so I modified it to be a cute dog charm.

SUPPLIES

Model magic or polymer clay

Paintbrush

Chalk pastels

Craft paint

Eye pin

Tooth pick